
Many cars have airbags along the roof edge. Disconnect the battery and wait at least 10 minutes before removing pillar trim, and never route fibres or wires across airbag areas.
Look up your headliner first
Find a headliner removal video for your exact make and model. Taking it down and putting it back is the hardest part of the job.
Low heat only
Keep the glue gun on its low setting. High heat can melt the fibre ends.
A pro can help
Never removed a headliner? An auto upholstery or car audio shop can take it down and refit it for you, and you do the stars.
In the box
Everything's included.
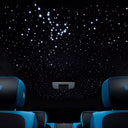
A dual-colour light engine, 1,050 fibres and the glue gun to fix them. Everything for a full night sky.
1×Light engine10W RGBW source with twinkle and music modes
750×Star fibres0.5 mm end-glow, 1.5 m (5 ft) each
300×Meteor fibres0.5 mm, for shooting-star trails, 1.5 m (5 ft) each
2×Fibre hubs4-port star hub and 10-port meteor hub
1×Master controller & RF remoteApp control, 16 million colours and 80 modes
4×Door handle lightsMatching accent lights for the doors
+Glue gun, glue sticks & upholstery pinPlus installation hardware and the user guide
Tools
What you'll need.
The glue gun and the poker are in the box. Bring a helper for taking the headliner down.
Plastic trim removal tools
Screwdrivers and sockets
Glue gun and glue sticksincluded
Upholstery pin (poker)included
Tape measure and chalk or marker
Flush cutters or sharp scissors
Circuit testeroptional
A helperoptional
Step by step
Seven steps to a starlit cabin.
Set aside a day. The photo follows the step you are reading.
Step 1 of 7
1Step 1
Test the system
Check every part works before you touch the car.
Plug a few fibres into each hub and fit the hubs to the light engine.
Power the light engine from a 12V source and pair the controller with the app.
Check that every port lights up and both colour zones work.
Pro tipTesting first means any problem shows up before the headliner is down.
2Step 2
Remove the headliner
Battery off, then take your time. The headliner is the one part you do not want to bend.
Disconnect the battery and wait 10 minutes.
Remove the sun visors, grab handles, dome lights and pillar trims.
Lower the headliner and slide it out through a front door or the rear hatch with a helper.
Lay it face down on a clean, soft surface.
Pro tipKeep the headliner flat at all times. A crease shows through once the stars are lit.
3Step 3
Plan your stars
Mark where every star goes on the back of the headliner so they spread evenly.
Mark a light grid of rows across the back with chalk or a marker.
Dot star positions at random within each row, so they look natural rather than in lines.
Mark short lines of dots for meteor trails.
Leave space around visor, handle and dome light mounts, and pick a spot for the light engine where there is clearance.
Pro tipMix it up. Small clusters and gaps look more like a real night sky than an even pattern.
4Step 4
Poke & thread
Push each fibre through from the back so it just pokes out the front.
Use the upholstery pin to poke a hole at every mark.
Thread a star fibre through each hole, starting closest to the light engine and working outward.
Use the meteor fibres for the shooting-star lines.
Leave a few millimetres sticking out of the front for now.
Pro tipWork in sections and put on a podcast. A thousand stars takes a while.
5Step 5
Glue & bundle
Fix every fibre on the back so none can slip out.
Put a small dot of glue on each fibre where it meets the back of the headliner.
Gather the fibres into neat bundles running toward the light engine.
Leave slack and avoid sharp bends, which dim the light.
Zip-tie or tape the bundles flat against the headliner.
Pro tipLow heat and small dots of glue. More glue does not mean a better hold.
6Step 6
Connect & trim
Wire up the light engine, then trim the stars flush.
Feed the star bundles into the 4-port hub and the meteor bundles into the 10-port hub, then fit both to the light engine.
Mount the light engine on the roof or the back of the headliner where it has clearance.
Run the power lead down a pillar to an accessory fuse, clear of any airbag, and ground it to bare metal.
Power it on, check every star lights, then trim each fibre flush with the fabric.
Pro tipCut flush without pressing into the fabric, so the stars sit level with the surface.
7Step 7
Reinstall & enjoy
Refit the headliner and everything you took off.
Lift the headliner back in with your helper and clip it into place.
Refit the pillar trims, dome lights, grab handles and sun visors.
Fit the door handle lights as shown in the user guide.
Reconnect the battery, pair the app and try the twinkle and meteor modes.
Pro tipA user guide with detailed instructions is included in the box.
Wiring
Wiring at a glance.
Fibres go into two hubs on the light engine, and the light engine takes power from an accessory circuit.
Power lead (fused)Accessory circuit at the fuse box
Run it down a pillar, clear of the curtain airbags.
GroundBare metal bolt on the roof or pillar
750 star fibres4-port star hub on the light engine
300 meteor fibres10-port meteor hub on the light engine
Pro tips
Do it once. Do it right.
Random beats perfectAn even grid looks fake once lit. Vary the spacing and the sky looks real.
Protect the fabricWork on a clean blanket and wash your hands. Headliner fabric marks easily.
Sunroof? No problemWork around the opening. You will have fewer stars, and the effect still fills the roof.
Clean gentlyWipe the headliner with a dry microfibre cloth. Skip harsh chemicals to keep the fibres bright.
FAQ
Install questions.
Stuck? Send us a photo and your order number and we'll help.
How long does the install take?
Plan on 6 to 10 hours. Removing and refitting the headliner takes part of that, and threading the stars takes the rest.
How many stars do I get?
1,050 fibres: 750 main stars and 300 meteor fibres, so you can show two colours at once.
Will it damage my headliner?
The fibres need small pinholes in the fabric, which are almost invisible with the lights off. The holes stay if you ever remove the kit.
Can I install it myself?
Yes, if you are comfortable removing your headliner. If not, an auto upholstery or car audio shop can take it down and refit it for you.
Does it work with a sunroof?
Yes. You work around the opening and place the stars on the rest of the headliner.
Are instructions included?
Yes. A user guide with detailed instructions is included in the box, along with the glue gun and glue sticks.
Get 10% off orders over $99, plus first look at new kits, drops and install tips.
By signing up you agree to receive marketing emails. Unsubscribe anytime. 10% off orders over $99, one use per customer. Can't be combined with other offers or sales.
You're in. Here's your 10%.
Welcome to the Glow Squad.
GETUNDERGLOW
Already applied. Takes 10% off orders over $99 at checkout. Not combinable with sale offers.